


You’ve probably heard of WordPress, a simple yet powerful CMS that lets you build great websites.
Maybe it has come across your mind to make a website for yourself or your business. But how are these websites made so easily yet so clean and powerful?
Here we are going to show you the basics of how to make a website using a powerful tool known as WordPress.
Before you start making a website, the first thing you have to do is to buy a Host and Domain.
As we mentioned in our other post, the domain is the name of your website (such as www.yourdomain.com). The address in which you see at the top of the browser. You must select a peculiar yet simple domain that the customers can easily remember.
After that, you must get a host for your domain, the cloud space that allows you to save the files and folders needed to keep the site up and running.
There are many companies in which you can buy these, such as Bluehost and GoDaddy.
After buying these two, we get to the fun part that is setting up WordPress on our website. Usually, if you get your services from the mentioned companies, you can install WordPress with one click. But if your host does not have this option, setting it up manually isn’t going to be a problem.
Now, you’re all set up to get started on designing your website.
The first thing you have to do after installing WordPress is to go to your website by entering the domain.
After installing WordPress and entering your details, you’ll be able to build your website the way you want it.
There are some things you should know about your website before you start editing:
To go to your admin panel, you have to type /wp-admin at the end of your domain. (i.e. www.yourdomain.com/wp-admin)
Here, you will see a menu on the left side of your page. We will go through them once to know what they’re for:
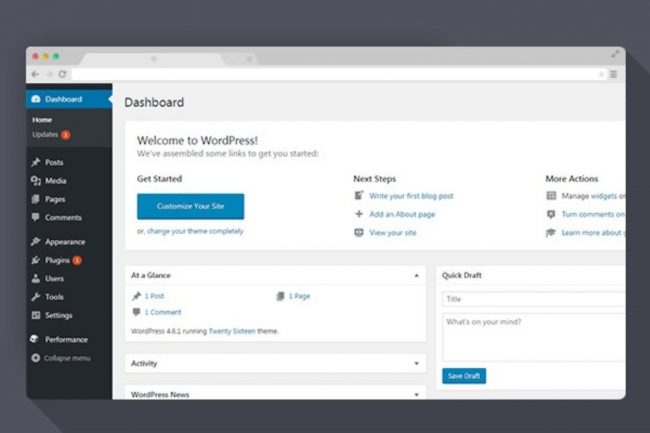
Dashboard is the first thing you’ll notice that also has two submenus, Home and Updates.
Home is your administration page and has some summaries and reports from the plugins and theme you’ll have on your website. And updates, well, shows you what you need to update.
Posts is where you publish your blog posts for your website and publish them so others can see and also boost your website’s rank (or worsen it if you don’t use proper SEO).
You can also make categories and tags for your posts so users can find what they’re looking for easily.
Media is where all your files will be restored such as images, videos, mp3 files, etc.
Pages is the place where you make your website’s pages like services, blogs, and more.
Comments is where you manage the comments that people write on your website (you can disable comments on your website by going to settings -> Discussion and unchecking “Allow people to submit comments on new posts” and click “save changes”)
Appearance is where you can select or upload a theme, customize your website’s settings, and edit your menu. It is important that you first upload a theme that fits best on your purposes and start to customize it using the accessibilities given to you. Note that once you upload once or several themes, you can only activate one.
Plugins is where you can add the plugins needed to add some possibilities to your website. Try not to add too many plugins as they will affect your site speed if you install too many of them.
*Note that it’s best to upload themes and plugins from trusted websites such as themeforest.com. If downloaded from unreliable sources, they may have malware and there will be a possibility of your website being vulnerable in the future.
Users is the place in which you can add administrators for your website or have others in roles such as editors, authors, etc.
It is also a place in which you can see your customers if you have an e-commerce website.
The Tools section is where you’ll check your website’s overall performance and it’s health. You can also export some info if you want to change your files or have a backup just in case.
And of course, we have the Settings tab where you can edit many crucial factors such as accessibilities, site title, and many other factors.
Here we tried to teach you the basics of making your website using WordPress. The next steps on how to upload a theme and edit them the way you want them to be will be uploaded soon.
Hope you enjoyed reading this blog.